
Disclaimer: I am not a photo editing expert, though I have used Photoshop Elements for years and find it does what I need it to do. Also, this photo was not printed onto a 12 x 12 inch sheet, but rather a 21 cm x 12 inch sheet which I then made up into a 12 x 12 layout. If you want to print onto something smaller or larger, adjust your page size. Also, I use a PC. If you use a Mac, the instructions will need to be modified. This is also my first tutorial, so please bear with me ;)
Photo Credit: Smarty Pants Photography (the real expert)
Ok, with that out of the way, this is how I did it:
I opened my photo in Photoshop Elements v 13.
By choosing Enhance > Convert to Black & White, I converted my photo to black and white (this step is optional).

I then cropped my photo.

I then proceeded to remove my background (again, optional). I did this using the Eraser tool, but you could try the Magic Wand Tool if you wanted. After choosing the Eraser, I made the size bigger to get rid of most of it, then smaller to go around the edges.

On the right hand side, create a Hue/Saturation adjustment layer.

Up the lightness to the desired setting, to go for a more 'watermark' look.

I then flatten the image to make it easier to copy onto the page I'm gong to print.

Create a new file, by going File > New > Blank File. Choose the settings that you need for your print size. I chose A4.

Once that's created, click on Photo Bin then double click on your photo to bring it up.

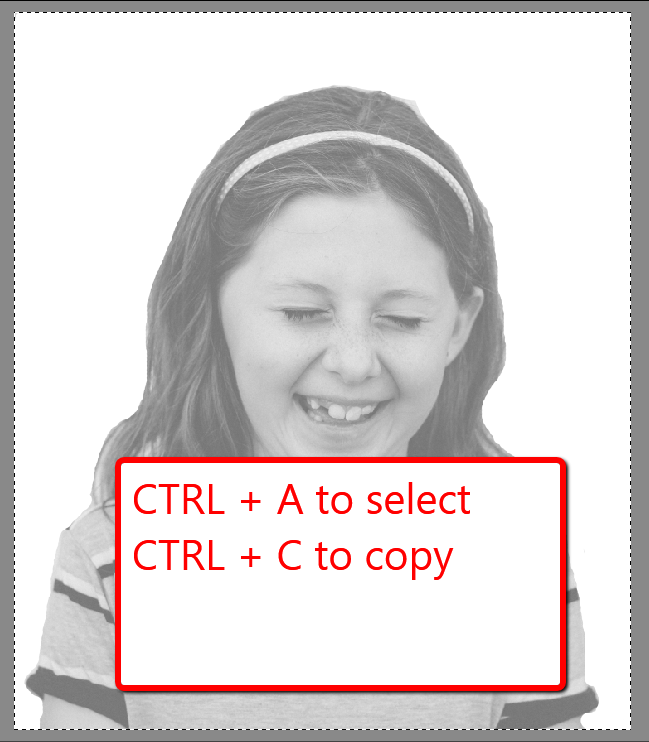
Select the image by pressing CTRL + A on your keyboard, then copy it by pressing CTRL + C.
Click on Photo Bin, then double click on the new file that you created. You should now be looking at the blank file.

Place the photo into the blank file by pressing CTRL + V on your keyboard.


You are now ready to print. I always try to print on a scrap piece of paper before I print on cardstock to get a feel for how it's going to look. If it comes out too dark, create a new Hue/Saturation layer and up the lightness, then try again. Don't forget to save your file if you think you may want it later.
Once you're ready to print on cardstock, place it into your printer and print. I printed on a piece of cardstock 21cm x 12 inches. This means there was a small space at the bottom of the photo that was blank, but it worked out ok for my layout. Keep this in mind if you are printing an A4 size photo onto a larger piece of cardstock.
Hope that explains it well enough for you, but feel free to ask any questions!
Happy scrapping
Rachel xx
Hi Rachel! Thank you so so much for that! Your page looks amazing and I really appreciate the time you took to do me a tutorial!
ReplyDelete